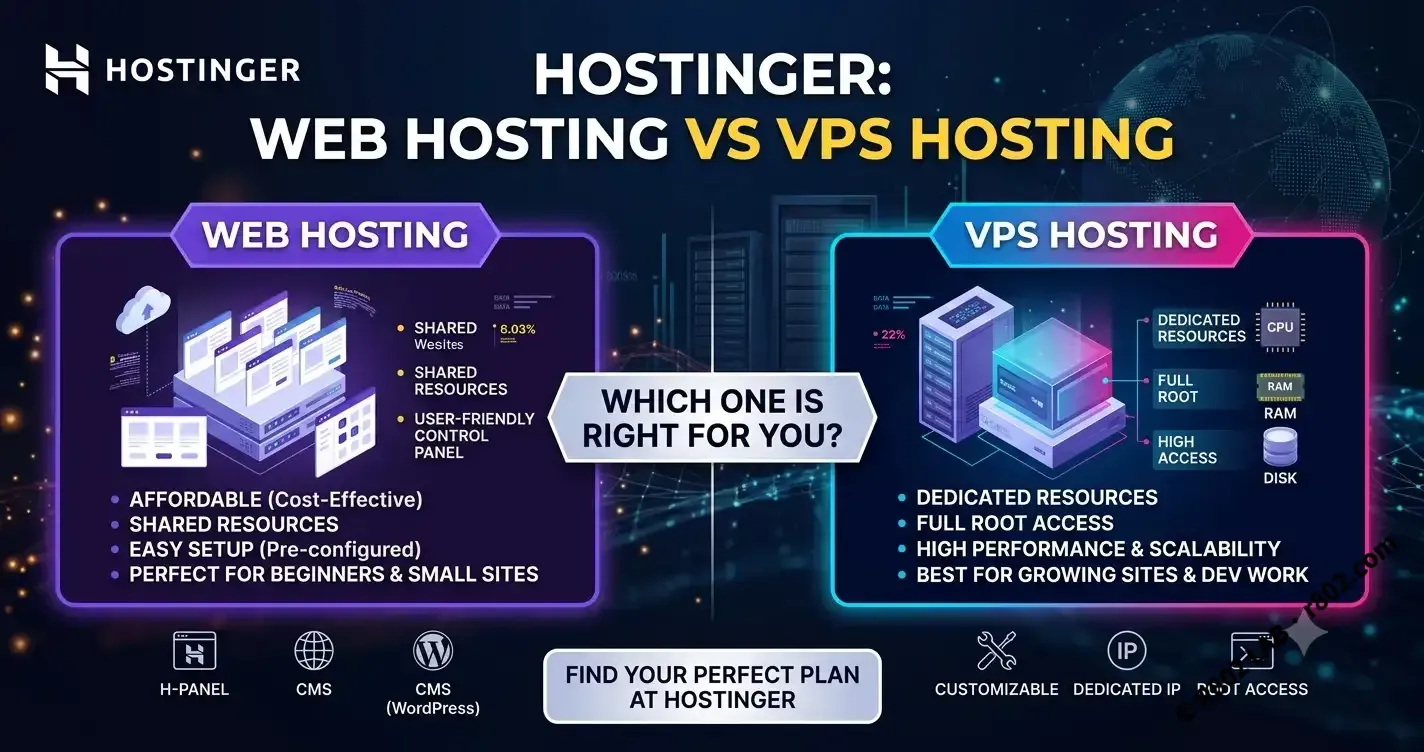
Choosing the wrong infrastructure for a WooCommerce store is a fast track to tanking your conversion rates. Slow checkout pages kill sales. If you are launching a new online store, you have two real paths on Hostinger: the hands-off, budget-friendly Shared Web Hosting route, or the high-performance, self-managed VPS route.
Here is a brutal, no-nonsense look at how the pricing actually breaks down, how to avoid Hostinger’s hidden upseling traps, and how to get a lean control panel up and running.
Option 1: The Hands-Off Budget Route (Shared Web Hosting)
If you are just testing the waters, want to keep costs at absolute zero, or genuinely dread managing a Linux server, go with Shared Web Hosting. You don’t get root access, meaning you don’t have to configure firewalls or optimize PHP pools. You just worry about WordPress and WooCommerce.
Performance takes a hit, but it is acceptable for an early-stage store with minimal traffic.
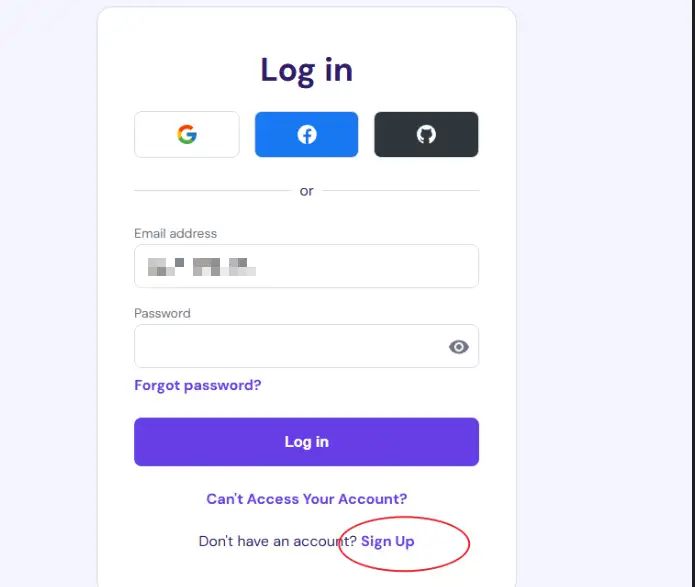
First, head over to Hostinger, hit the login button in the top right, and sign up using your email or just link your Google account.

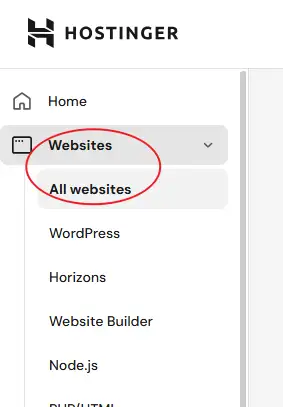
Once you are inside the Hostinger hPanel, navigate to Websites on the left menu.
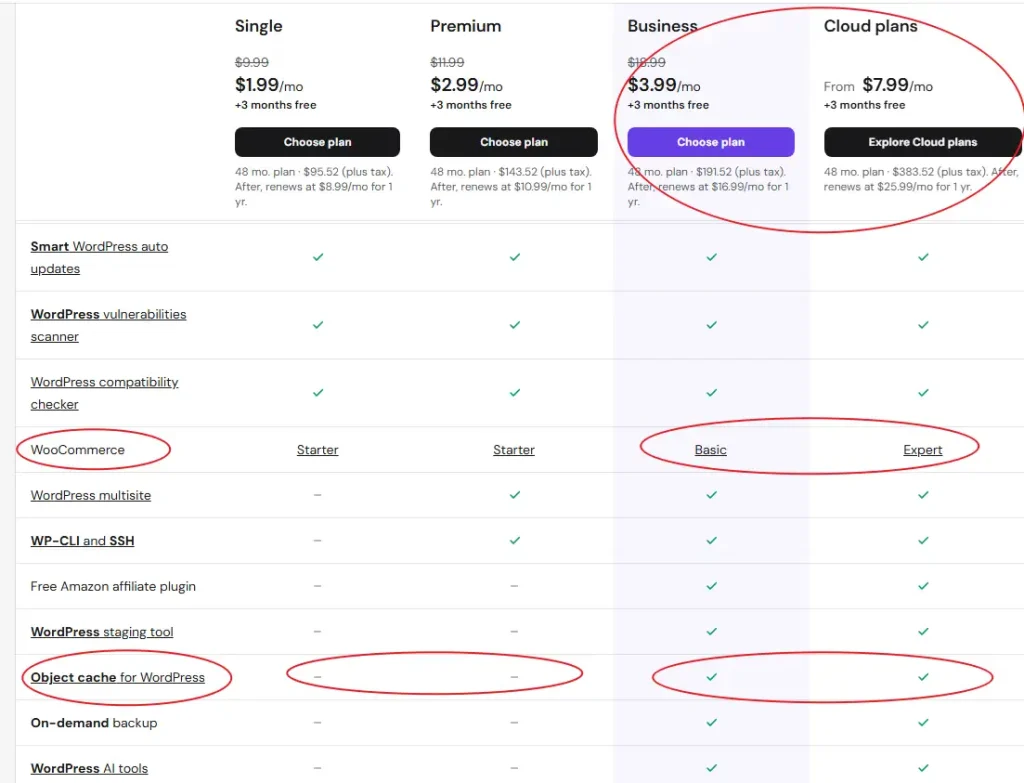
Hostinger hides actual compute resources (CPU/RAM) on shared plans, so you have to judge them by feature availability. For WooCommerce, Object Cache is mandatory. Without it, database queries will choke your page load times. This limitation immediately eliminates the cheapest entry-level tiers. You only have two real options: Business or Cloud Global. Both throw in a free domain for the first year.
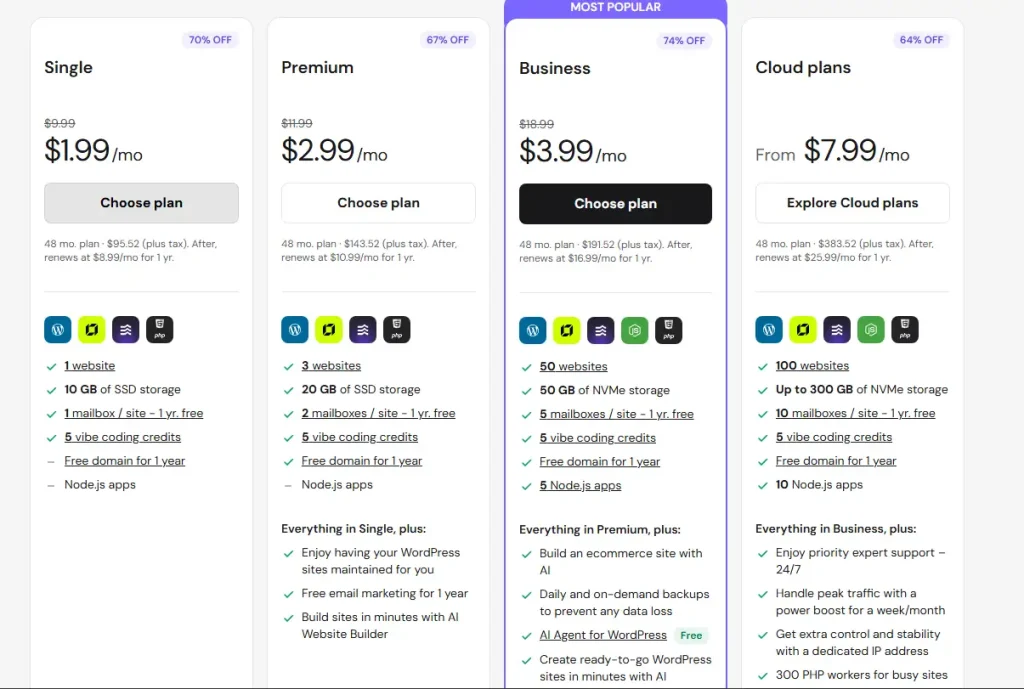
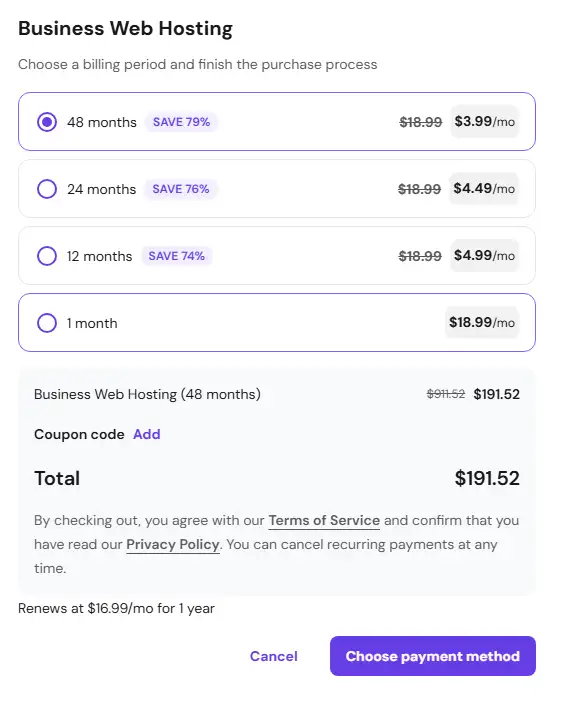
The Shared Pricing Trap
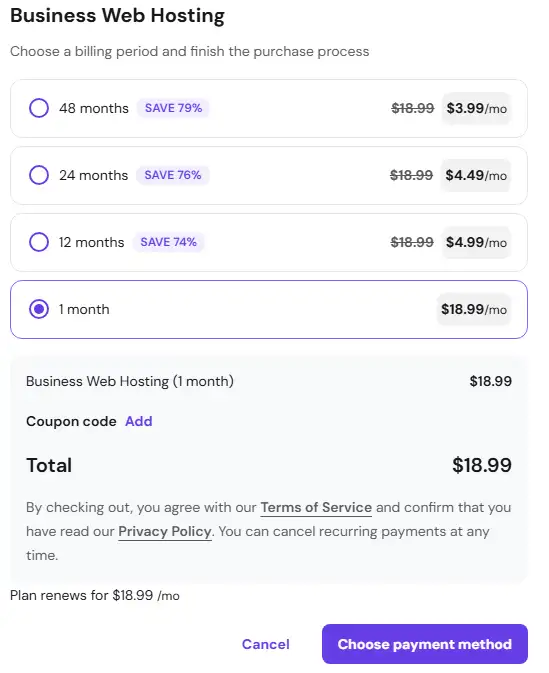
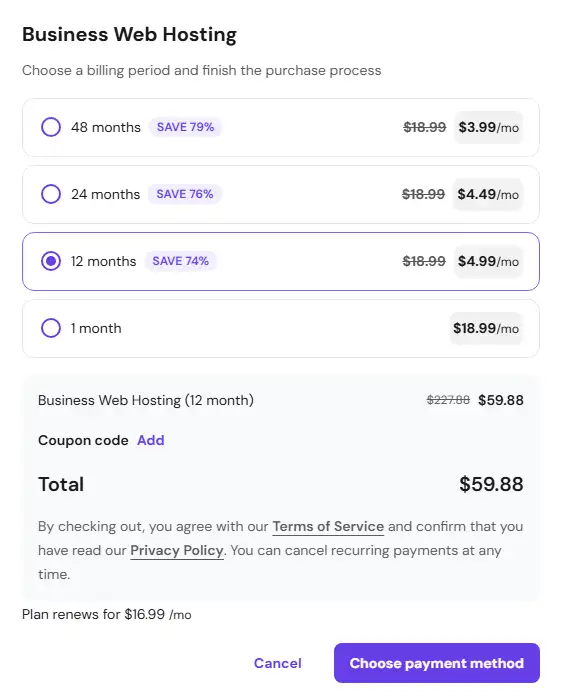
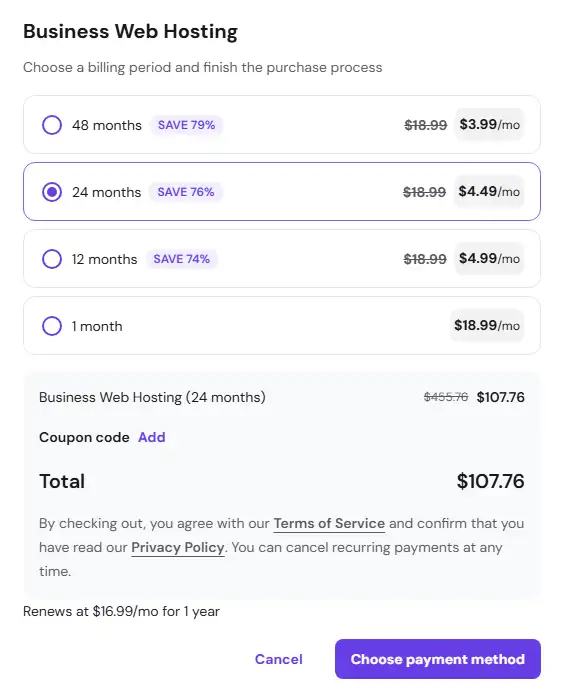
Let’s break down the Business Plan math because Hostinger loves aggressive renewal hikes:
- Month-to-month: $18.99/mo. Total waste of money due to massive setup friction.
- 12 Months: $59.88 upfront ($4.99/mo), but it renews at $16.99/mo next year.
- 24 Months: $107.76 upfront. Best middle ground to lock in the promo rate.
- 48 Months: $191.52 upfront. Great if you’re committed long-term, keeping the renewal rate at $16.99/mo anyway.
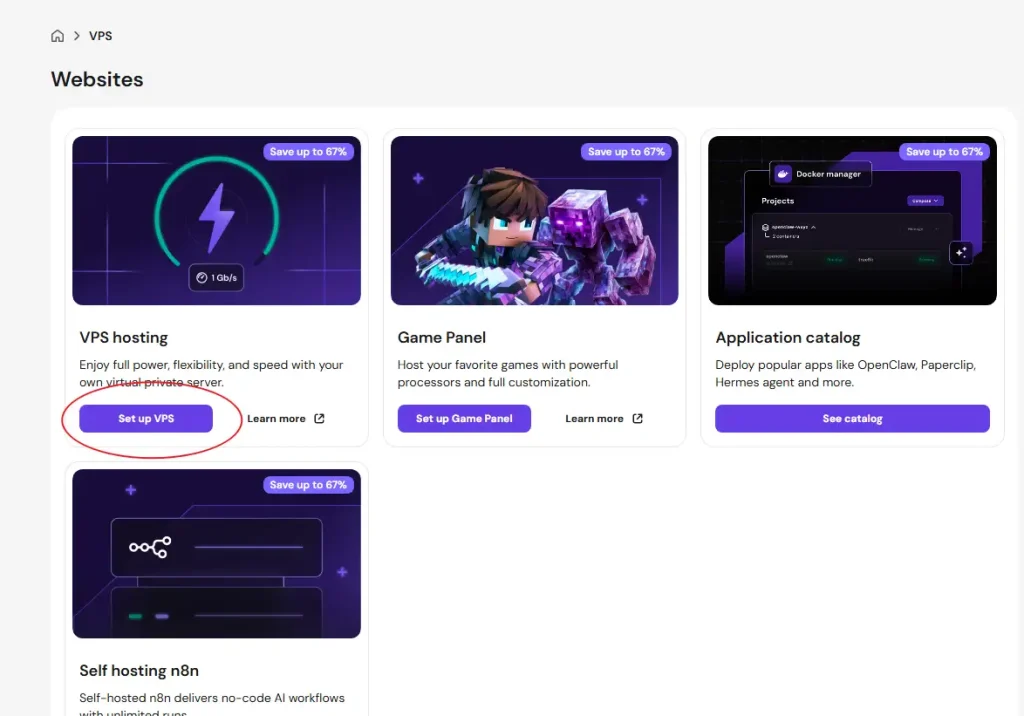
Option 2: The Performance Route (VPS Hosting + Control Panel)
If you want actual raw power, dedicated resources, and isolated performance that won’t lag when processing concurrent checkouts, buy a VPS. For a production WooCommerce site, 4 GB RAM and 2 vCPU cores is the baseline standard for handling database spikes. You also need fast NVMe storage; capacity doesn’t matter much early on—a few dozen gigabytes is plenty for launch.
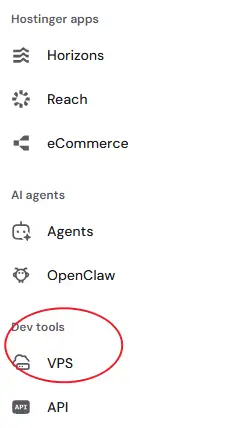
Click VPS at the bottom left of your hPanel dashboard to get started.
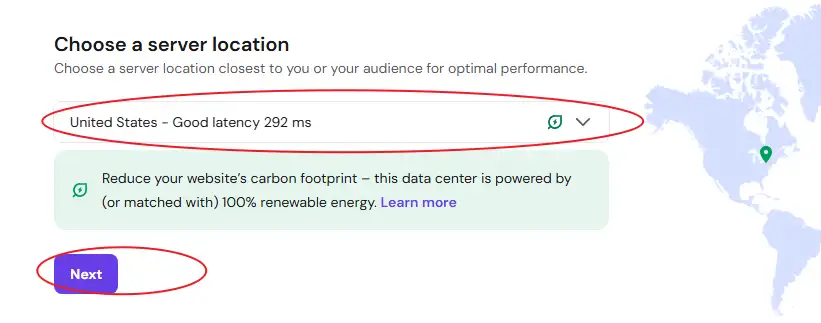
Pick Your Location and OS
First rule of hosting: pick a data center closest to your actual paying customers, not yourself.
When selecting your OS image, you have a few solid choices depending on your control panel preference:
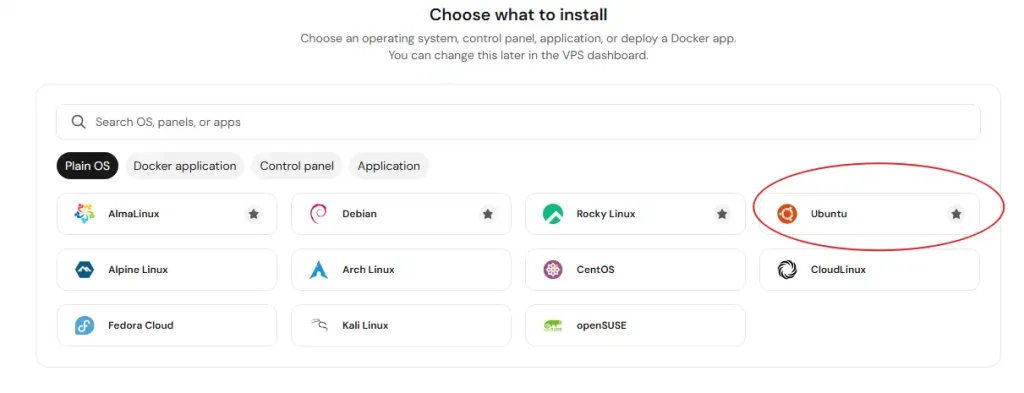
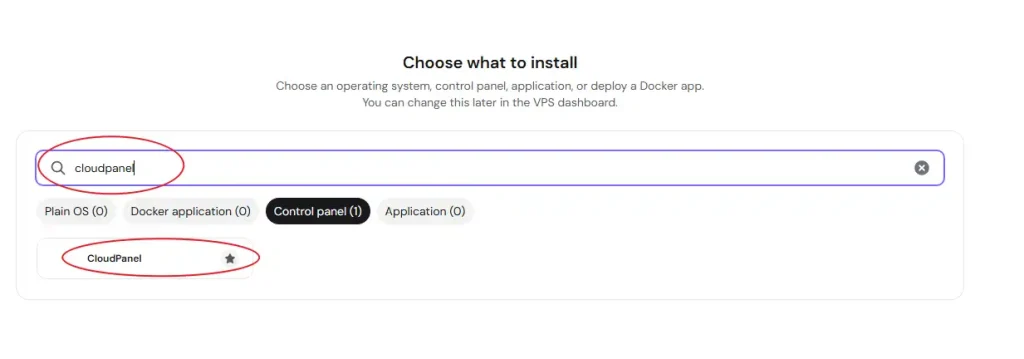
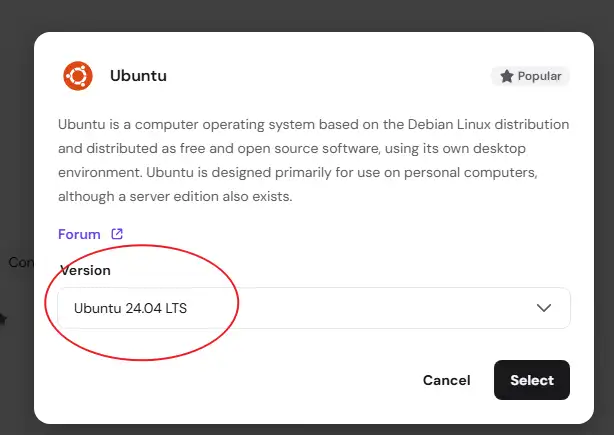
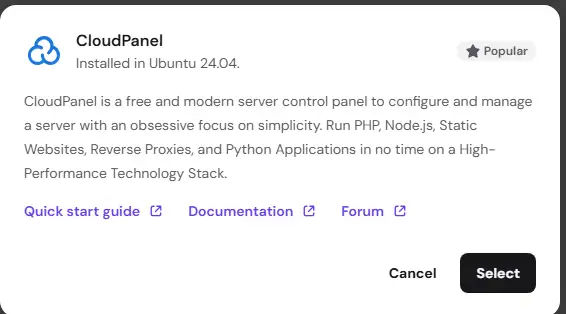
- CloudPanel (Recommended): Search for the CloudPanel template. It automatically deploys Ubuntu 24.04 LTS and configures CloudPanel. It is free, heavily optimized for PHP/WordPress, and built for maximum performance.
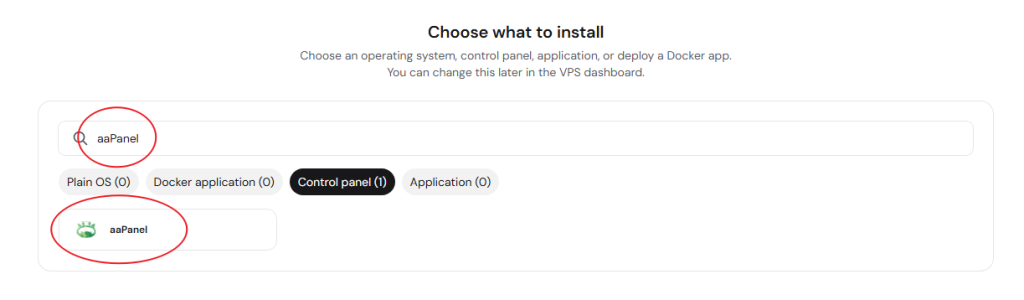
- aaPanel: If you aren’t paranoid about its Chinese origin, aaPanel offers more free features out of the box and is objectively more beginner-friendly than CloudPanel. It defaults to an older Ubuntu 22.04 LTS base image, which is the developer’s recommended environment.
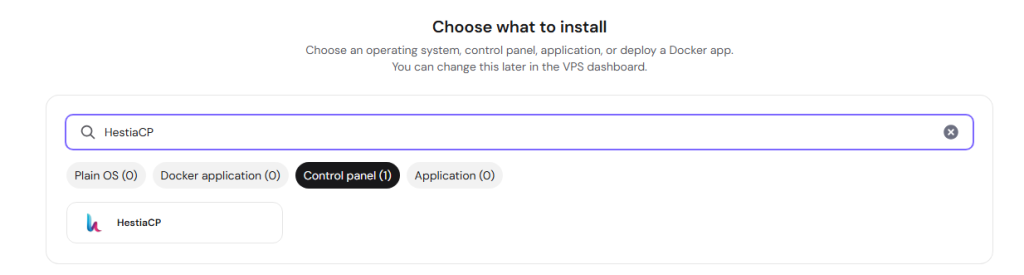
- HestiaCP: A brilliant, 100% open-source alternative (CloudPanel and aaPanel are proprietary/closed-source under the hood). It runs cleanly on Ubuntu 24.04 LTS.
Honestly, don’t overthink the open-source vs. closed-source debate here. As long as the panel is stable, secure, bug-free, and saves you hours of terminal tinkering, use it. Your time is worth more than licensing pedantry. All three can be installed via the hPanel image search.
Server Configuration Details
Set a bulletproof root password (uppercase, lowercase, digits, special characters) and store it safely in your password manager. Skip the SSH key configuration for now if you just want to get moving.

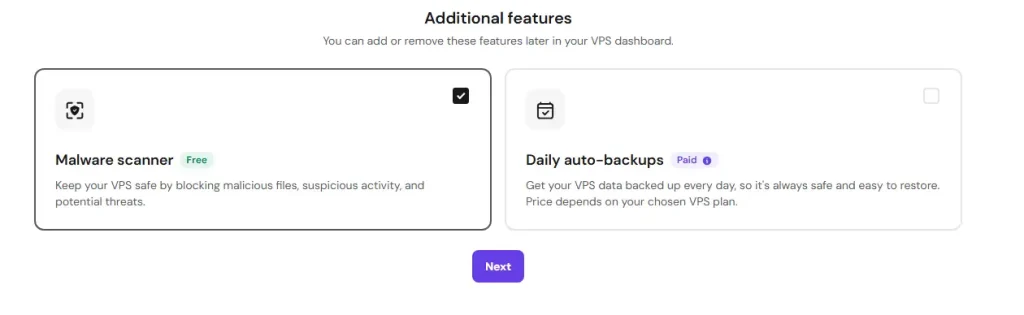
Uncheck “Daily auto-backups” under Additional Features. Hostinger charges an extra monthly fee for this. Skip it. You can easily configure free, automated offsite backups to S3 or Backblaze directly inside CloudPanel or HestiaCP later. Leave the Malware Scanner checked since it’s free.
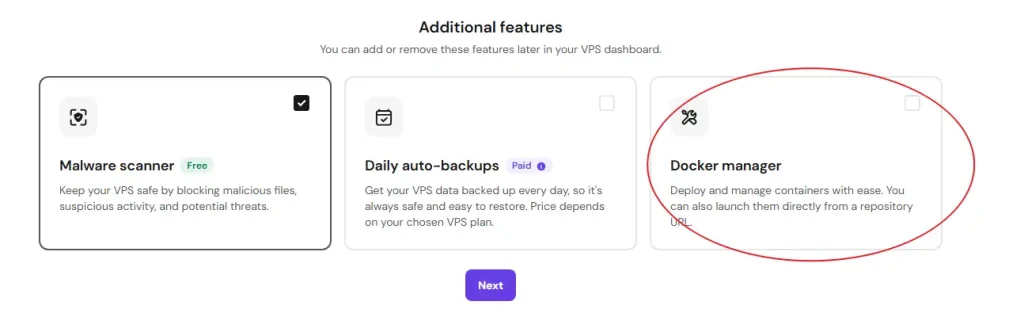
If you choose a stock Ubuntu image instead of a pre-configured panel template, you will see a Docker manager toggle. Turn it off. You won’t need it for a standard bare-metal WooCommerce stack.
VPS Plan Tier Selection & Real Costs
Stick to KVM 1 (1 vCPU, 4 GB RAM) or KVM 2 (2 vCPU, 8 GB RAM). Anything less will crash during database indexing.
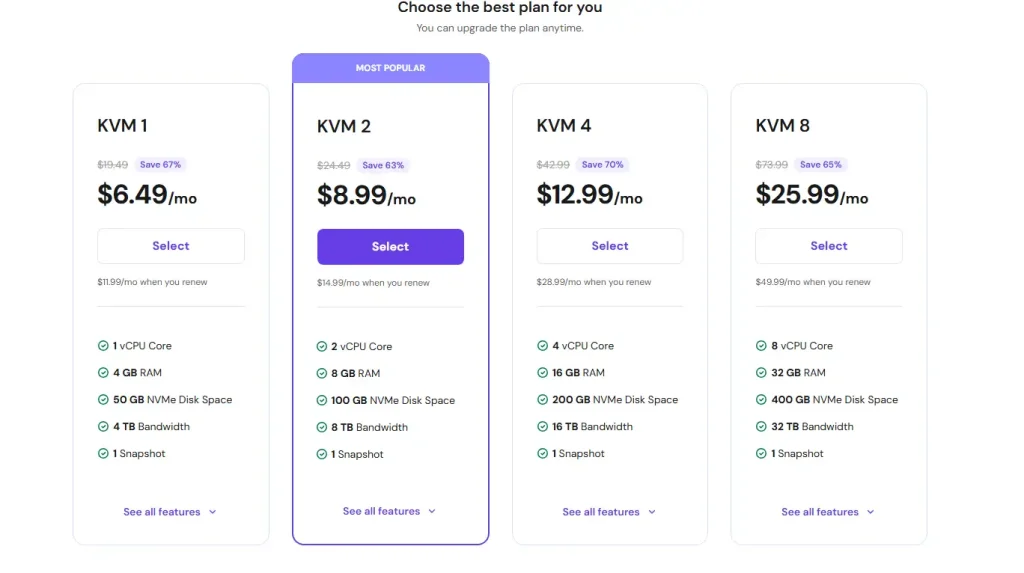
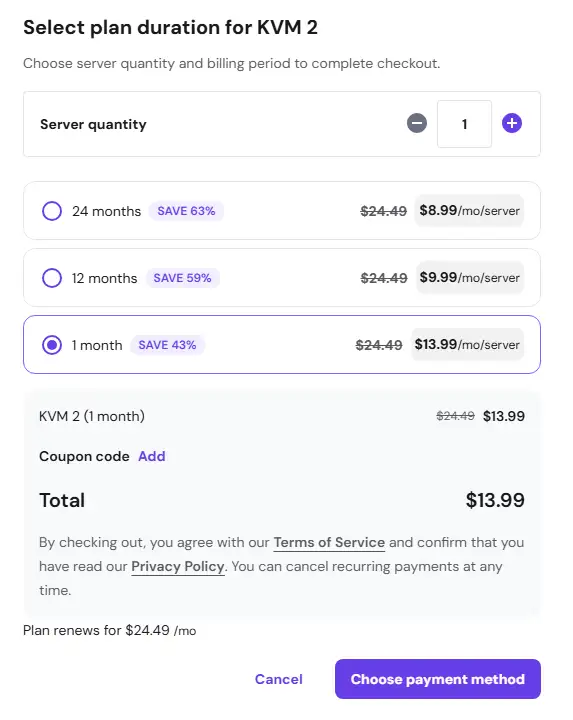
The KVM 2 Math (Sweet Spot for Performance)
- Month-to-month: $13.99 for the first month, but then it jacks up to $24.49/mo immediately. Avoid.
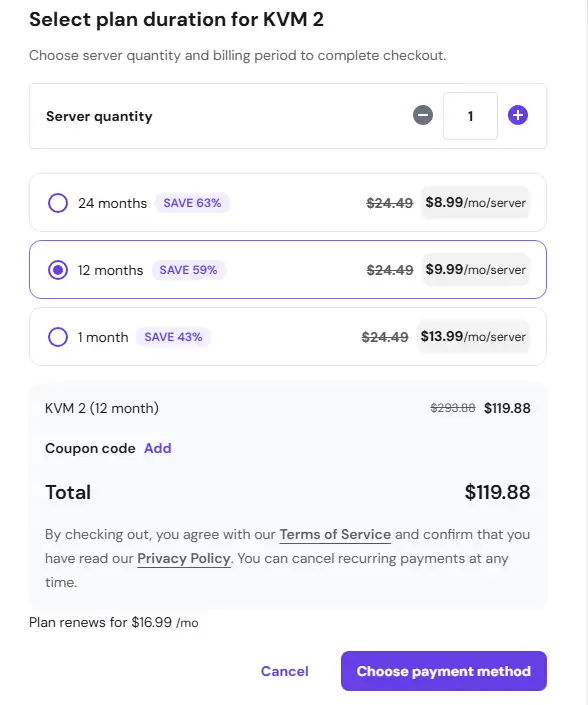
- 12 Months: $119.88 upfront ($9.99/mo). Renews at $16.99/mo.
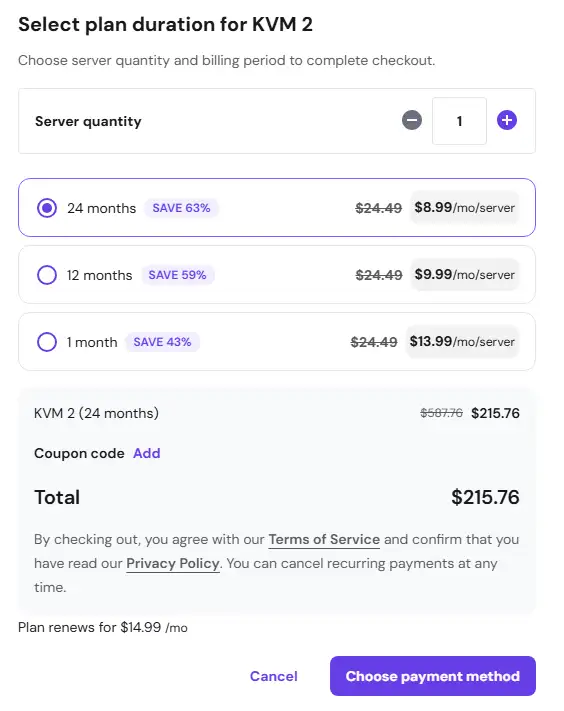
- 24 Months: $215.76 upfront ($8.99/mo). This is the smartest financial play, locking in a lower $14.99/mo renewal price two years down the line.
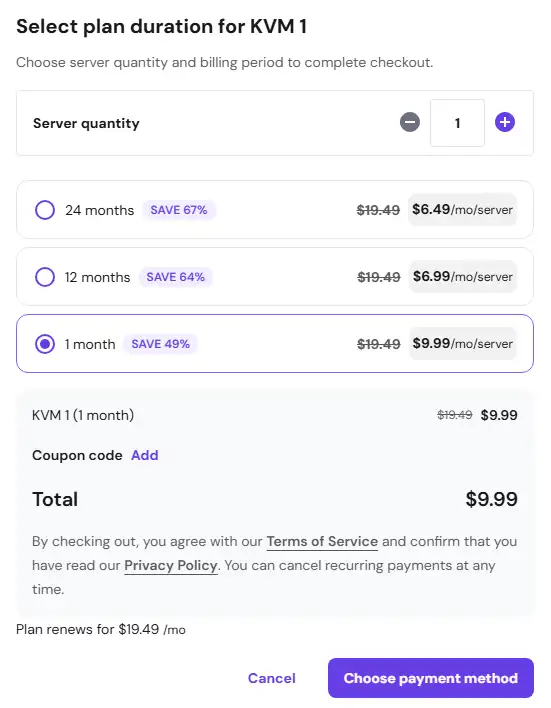
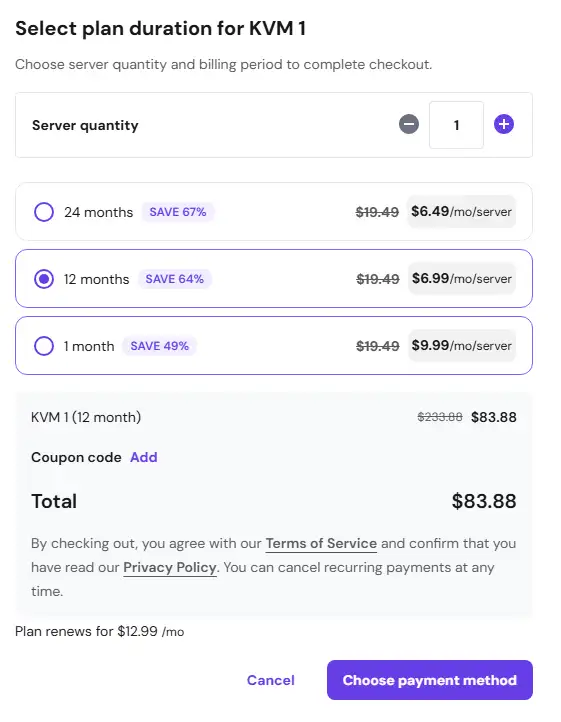
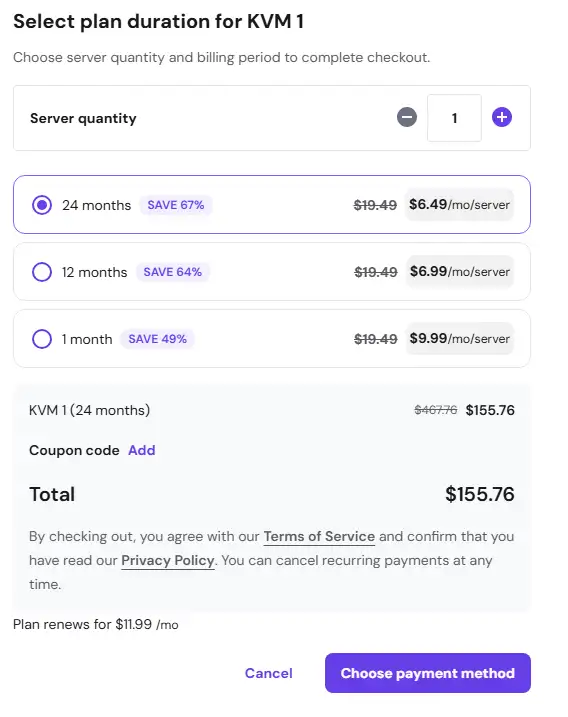
The KVM 1 Alternative (Tight Budgets)
If you are strapped for cash, drop down to KVM 1. The 1 vCPU core is a tight bottleneck, but the 4 GB RAM will keep MySQL alive through early launch traffic.
Performance drops compared to KVM 2, but it gets the job done. Barely. Pricing scales down similarly across the 1, 12, and 24-month commitments as shown below:
Once the deployment finishes, copy your server IP, bypass the self-signed cert warning in your browser, and jump right into your fresh control panel instance to configure your WordPress site.
In the next tutorial, we’ll walk through how to install WordPress inside CloudPanel, map your domain name with a single click, and issue an SSL certificate.