This guide applies to both multisite and single-site WordPress and WooCommerce setups.
Prerequisite: You generally need VPS hosting for this configuration. Standard shared web hosting typically doesn’t allow object caching (Redis or Memcached) unless explicitly offered by your provider. For example, certain Hostinger shared plans do support object caching. For more details on their options, see Hostinger for WooCommerce: Shared vs. VPS Hosting (Plus Quick CloudPanel Setup).
Here is a look at the final Lighthouse performance scores achieved with this stack: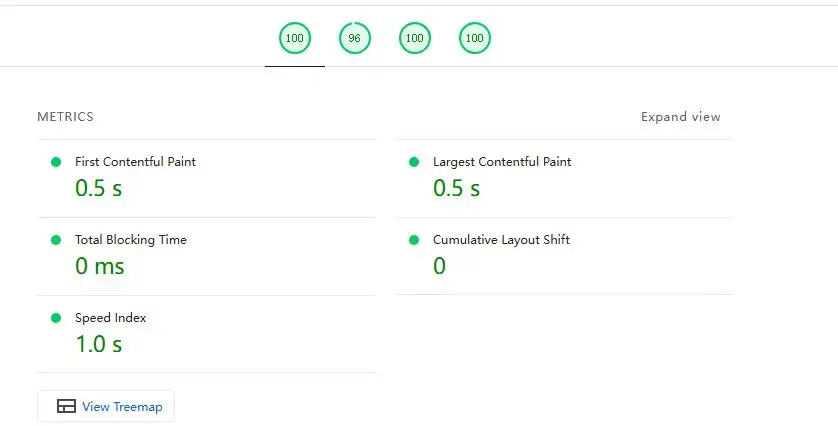
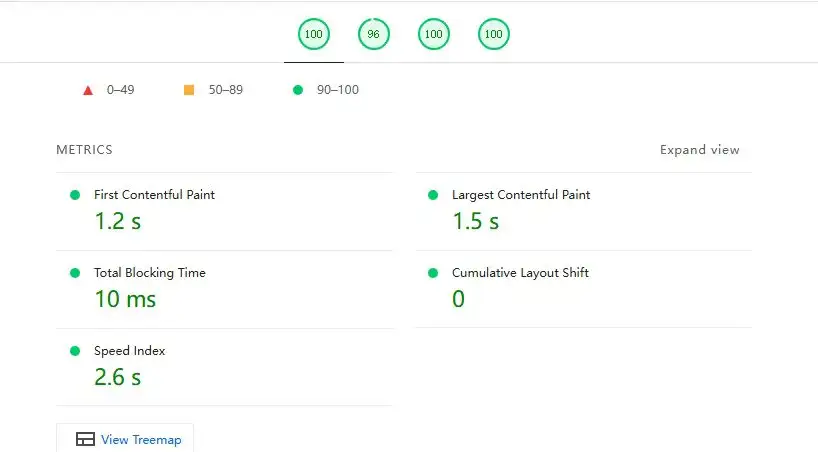
These speeds were achieved using a completely free stack: Redis Object Cache, PHP OPcache, page caching, and Cloudflare CDN.
The only WordPress plugins required are:
Your server needs the Redis or Memcached daemon along with the corresponding PHP extension installed. Because the setup workflow varies across server control panels, check your panel’s documentation first. You can also install them directly via the Linux CLI, though doing so means you won’t be able to manage Redis/Memcached directly through your VPS control panel dashboard. (This is generally fine, as they rarely require maintenance or configuration tweaks once running.)
The following steps cover direct server installation for Redis. Unless your server is extremely resource-constrained (e.g., 2GB RAM or less, where Memcached is lighter), Redis is the recommended choice.
1. Install the Redis Server and PHP Redis Extension
First, check if Redis is already running on your server. Some VPS control panels install it by default. If it is already active, skip this step.
# Returns PONG if Redis is installed and running
redis-cli ping
Install the Redis Server
If you are setting up a fresh server, Ubuntu 24.04 is highly recommended.
For Ubuntu / Debian:
sudo apt update
sudo apt install -y redis-server
For RHEL / CentOS / Rocky Linux / AlmaLinux:
sudo dnf install -y epel-release
sudo dnf install -y redis
Enable Redis to start on boot and start the service:
sudo systemctl enable redis
sudo systemctl start redis
Verify that it is running successfully using redis-cli ping.
Install the PHP Redis Extension
For Ubuntu / Debian:
sudo apt install -y php-redisFor RHEL / CentOS / Rocky Linux / AlmaLinux:
sudo dnf install -y php-pecl-redisVerify the extension is active:
php -m | grep redis2. Enable the PHP OPcache Extension
Almost all modern server control panels enable OPcache by default, so no manual configuration is required here.
3. Install the WordPress Plugins
Navigate to https://yourdomain.com/wp-admin/plugin-install.php. Search for and install both Redis Object Cache (by Till Krüss) and WP Super Cache (by Automattic).
Redis Object Cache handles the connection between WordPress and your server’s Redis instance, while WP Super Cache manages page-level caching.
4. Configure the Redis Object Cache Plugin
Open your site’s root wp-config.php file and add the following code block. It is best to paste this right above the /* That's all, stop editing! Happy publishing. */ line. This step is mandatory for multisite setups and optional but recommended for single sites:
// Define a unique cache key prefix for each site
define( 'WP_REDIS_PREFIX', 'site1_unique_string_' );
Note: Do not use
WP_CACHE_KEY_SALTto set a salt. This is explicitly discouraged by the plugin developers. For more details, refer to the official plugin documentation.
This prefix is the only setting you need to modify in WordPress; the plugin’s default configurations are highly optimized out of the box.
Next, you need to adjust two parameters on the server side in the Redis configuration file (redis.conf), typically located at /etc/redis/redis.conf. Open it with your text editor:
vim /etc/redis/redis.confFind the following line:
# maxmemory <bytes>Replace it with:
maxmemory 536870912This allocates a 512MB memory limit to Redis, which works well for a server with 4GB of RAM. Scale this up or down based on your available hardware.
Next, find this line:
# maxmemory-policy noevictionReplace it with:
maxmemory-policy allkeys-lruThis tells Redis to drop the least recently used (LRU) keys across all data sets when it hits the memory cap, regardless of expiration status.
Restart Redis to apply the changes:
sudo systemctl restart redis-serverFinally, go to your WordPress dashboard, navigate to the Redis Object Cache settings, and click Enable Object Cache.
Once active, your status screen should look like this: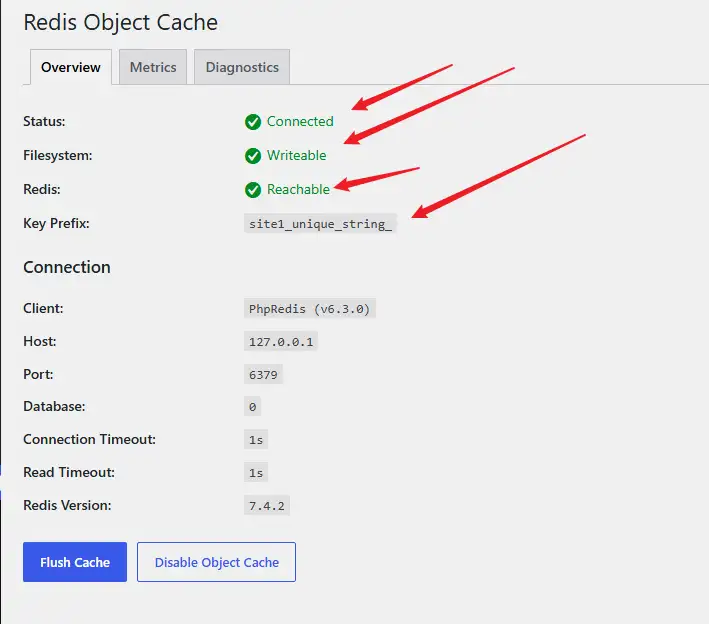
5. Configure the WP Super Cache Plugin
WP Super Cache’s Expert Mode provides the fastest possible application-layer page caching. It functions identically to W3 Total Cache’s Disk Enhanced mode. Because we are using a dedicated plugin for object caching, WP Super Cache serves as a lightweight alternative focused purely on static page generation.
When a cache hit occurs, Nginx serves the pre-generated static HTML file directly to the browser, bypassing PHP and WordPress entirely.
Enable Expert Mode
Go to the plugin settings in your dashboard, select Expert, and click Update Status.
Expiry Time & Garbage Collection Settings
- For static sites (e.g., Blogs): Set the Cache Timeout to
604800seconds (7 days). Set the Scheduler to Clock and target a low-traffic window like 2:00 AM or 3:00 AM local time.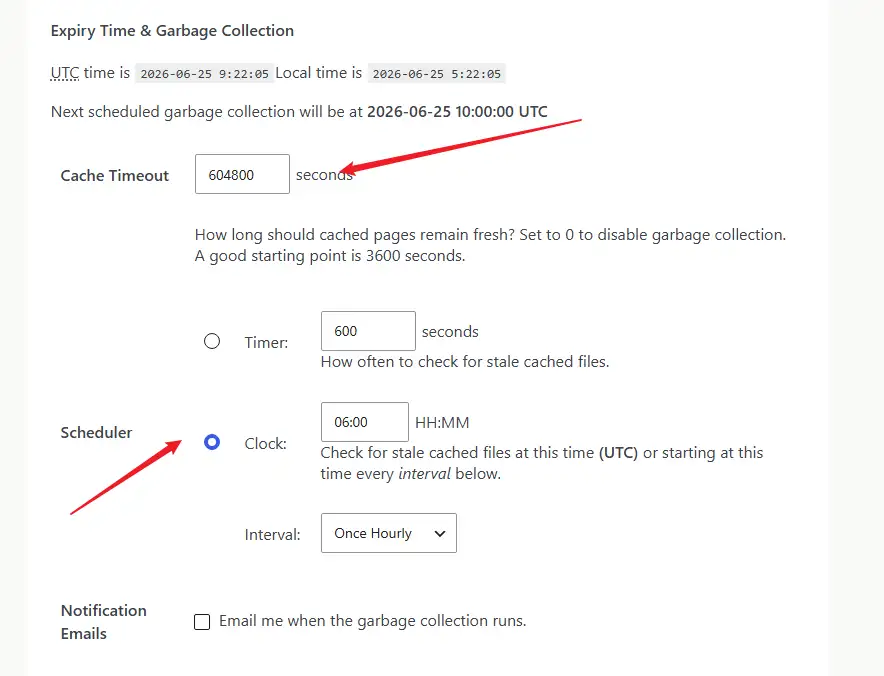
- For dynamic sites (e.g., WooCommerce): Set the Cache Timeout to the recommended
3600seconds. Set the Scheduler to Timer to check for stale files every600seconds.
Rejected URL Strings (WooCommerce Only)
Add the following strings to the text field and save your changes. This step ensures dynamic e-commerce infrastructure remains uncached. For standard blogs, leave this section at its defaults.
cart
checkout
index\.php
my-account
wp-.*\.php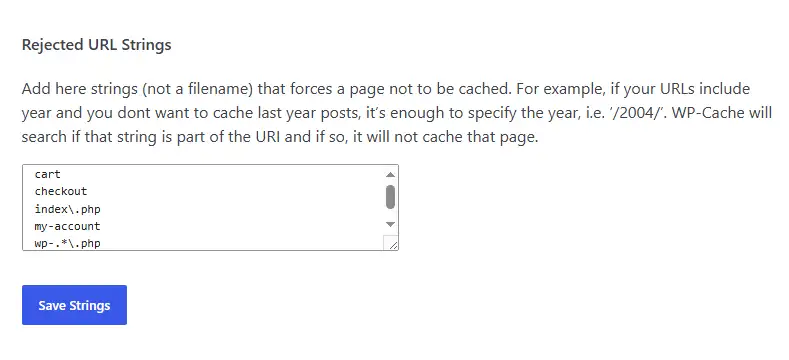
Rejected Cookies (WooCommerce Only)
Add these cookie exceptions to the text box and save:
wptouch_switch_toggle
woocommerce_cart_hash
woocommerce_items_in_cart
wp_woocommerce_session_
woocommerce_recently_viewed
store_notice[notice id]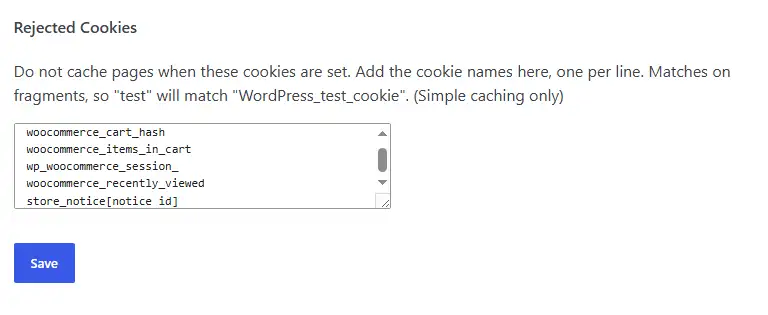
Leave all other plugin options at their defaults.
Next, open your Nginx server block configuration file (vhost), usually found at /usr/local/nginx/conf/vhost/*.conf.
If your existing rule block matches this standard fallback pattern:
location /
{
     try_files $uri $uri/ /index.php?$args;
}

rewrite /wp-admin$ $scheme://$host$uri/ permanent;
Remove those lines and replace them with the following Nginx ruleset, then save and restart Nginx:
# 1. Enforce trailing slash on wp-admin URLs
rewrite /wp-admin$ $scheme://$host$uri/ permanent;

# 2. Initialize cache tracking variable using the request path
set $cache_uri $request_uri;

# 3. Bypass static cache for POST requests (e.g., form submissions, comments)
if ($request_method = POST) {
    set $cache_uri 'null cache';
}

# 4. Bypass static cache for URLs with query strings (e.g., search results ?s=xxx)
if ($query_string != "") {
    set $cache_uri 'null cache';
}

# 5. Bypass static cache for core administrative, authentication, and feed paths
if ($request_uri ~* "(/wp-admin/|/xmlrpc.php|/wp-(app|cron|login|register|mail).php|wp-.*.php|/feed/|index.php|wp-comments-popup.php|wp-links-opml.php|wp-locations.php|sitemap(_index)?.xml|[a-z0-9_-]+-sitemap([0-9]+)?.xml)") {
    set $cache_uri 'null cache';
}

# 6. Bypass static cache for authenticated users and recent commenters
if ($http_cookie ~* "comment_author|wordpress_[a-f0-9]+|wp-postpass|wordpress_logged_in|woocommerce_items_in_cart|woocommerce_cart_hash|wp_woocommerce_session_") {
    set $cache_uri 'null cache';
}

# 7. Route requests directly to Super Cache static HTML files via HTTPS pathing
location / {
    try_files /wp-content/cache/supercache/$http_host/$cache_uri/index-https.html $uri $uri/ /index.php?$args;
}
Note: These rules are written specifically for Nginx. They will not function on Apache setups using
.htaccessfiles.
6. Route Static Assets via Free Cloudflare CDN
Log in to your Cloudflare dashboard . Point your domain’s nameservers to Cloudflare if you haven’t already.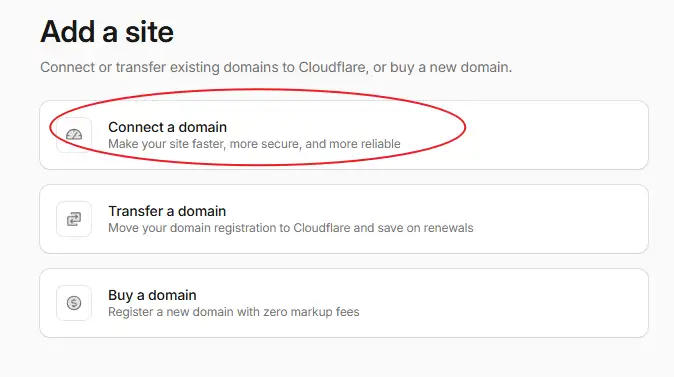
Enter your domain name: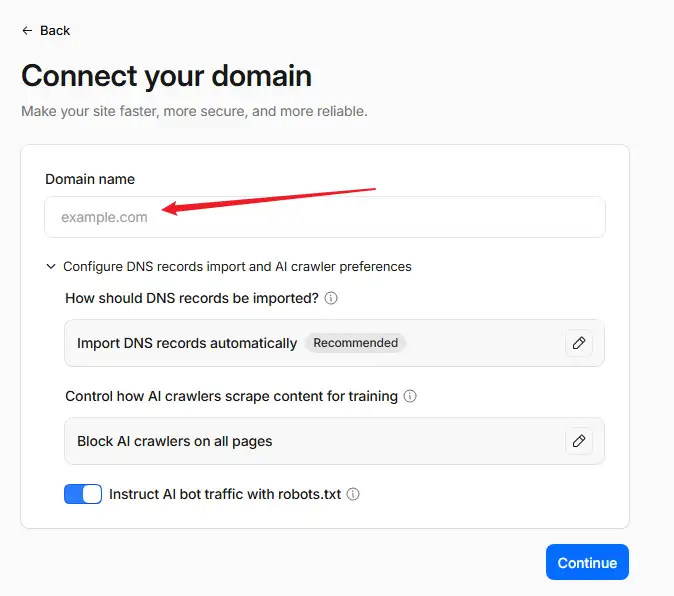
Update your nameservers at your domain registrar with the pairs provided by Cloudflare, then wait for propagation (this typically completes within a few minutes).
In the Cloudflare DNS panel, map your root domain and www record to your server’s public IP address, ensuring the proxy status is active (the cloud icon should be orange).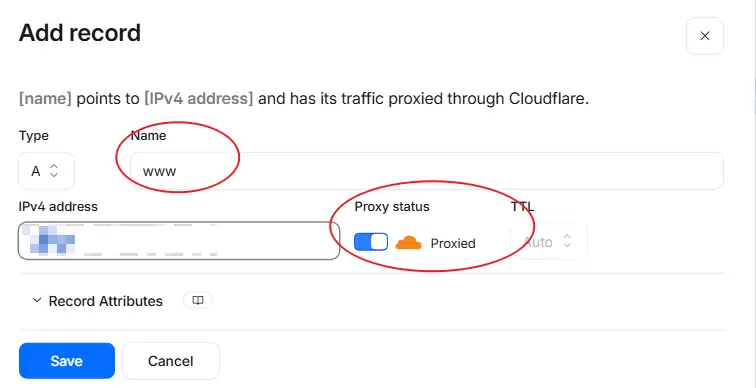
Cloudflare handles asset caching out of the box by only edge-caching static assets by default.
Verifying the Configuration
Open an Incognito/Private window in your browser, load your site, and refresh it a few times. Open DevTools (F12), go to the Network tab, and perform a hard refresh (Ctrl + F5).
Click the primary HTML document request and inspect the headers. The cf-cache-status value should read DYNAMIC. This confirms Cloudflare is passing the HTML layer directly to your origin server, which is exactly what we want.
Next, click on any static asset link (CSS, JS, or image files). The cf-cache-status header for these assets should show HIT.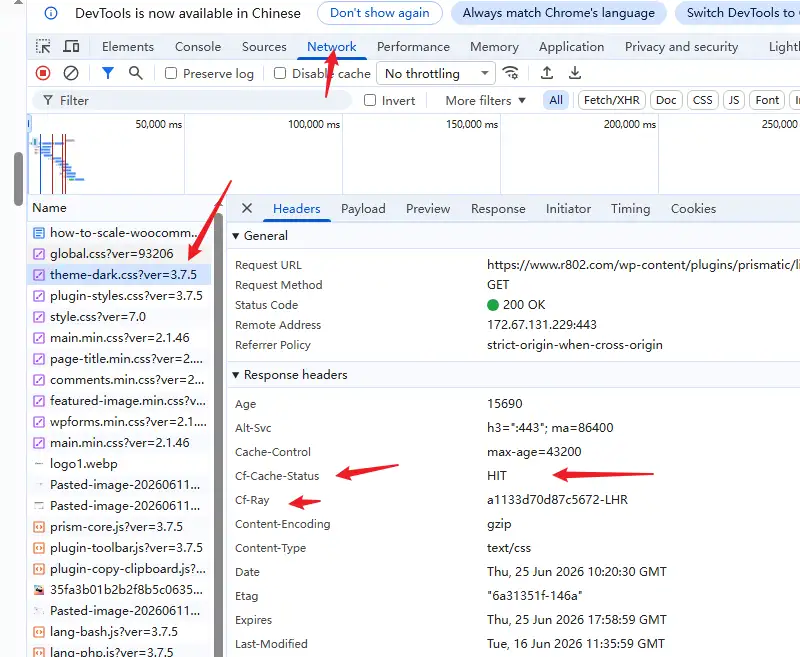
When static components return a HIT, it means Cloudflare’s edge network is serving your assets directly. Meanwhile, page rendering and HTML logic remain handled locally on your server by WP Super Cache. This separation avoids the need for complex Page Rules on Cloudflare.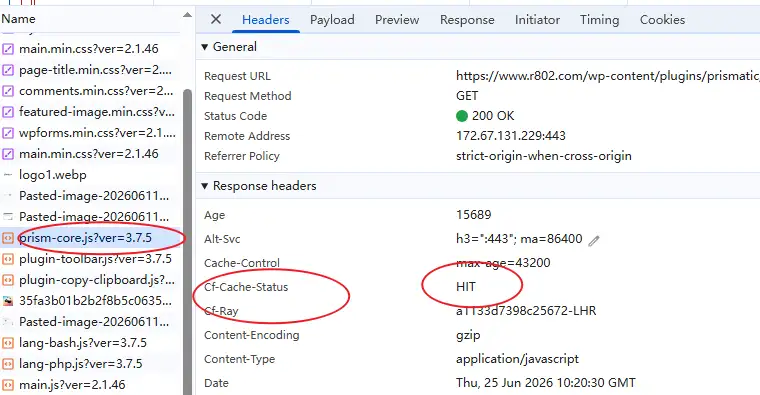
Wrap-up
By offloading specific caching jobs to different layers—Redis handling object states, OPcache optimizing script execution, WP Super Cache handling HTML generation, and Cloudflare delivering static media—you minimize the risk of cache conflicts.